How To Set Up A Project In ActiveCollab
This article will outline the steps necessary to successfully set up a project in ActiveCollab. In order to make this process as seamless and pain-free as possible, I’m including some screenshots of what our ActiveCollab set up looks like. Yours may vary slightly.
- Sign in to your ActiveCollab account.
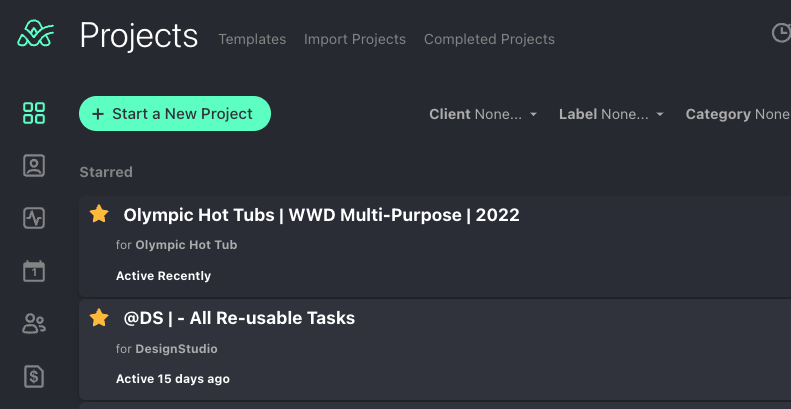
- After sign-in, you will land on your default dashboard. Ours happens to be set to the “Projects” section.
 From that screen you will click the “Start a New Project” button on the upper left-hand side of the screen. This opens a new window where you will start adding information about the project.
- Once you get to this screen, you will notice the hyper-linked text that reads “Show more options”. You will want to click on that to expand the area where you will enter additional relevant info.
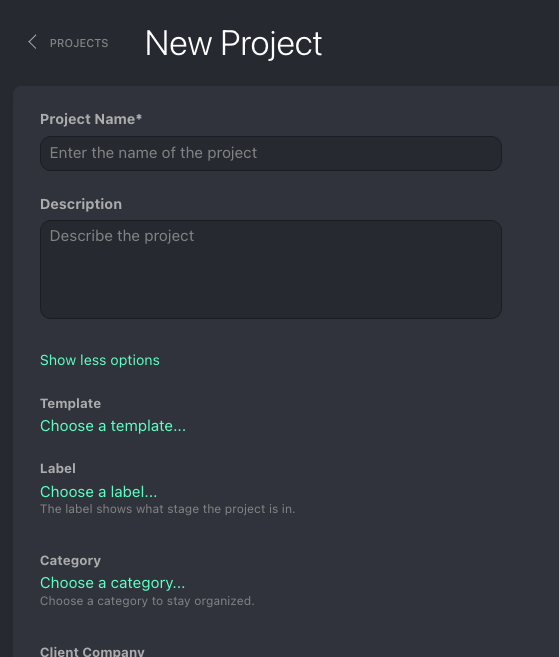 The “Project Name” field is the only one that is required, but as a best practice, you will want to add as much information as possible. Below I will outline our formatting process for each field we use here at DesignStudio, but keep in mind if you are reading this and using this platform outside of DesignStudio, you may want to adjust the fields you use. Examples are in parenthesis below.
- Project Name: Client Name | What type of engagement (Hot Tubs Forever | Flex Retainer 2022)
- Description: This should list the number of hours and the billing rate, along with a short description. This field does have a max character limit, so try to keep it brief. (This is a 500 hour retainer for all marketing and creative services. Billed at $70/hr.)
- Label: We have pre-determined the category labels here at DesignStudio. Your admin will usually have done this for your organization. Select a label by finding it from the list and clicking on the associated radial button (circle) next to it. (FLEX RETAINER)
- Category: The same steps that you followed for the label field above will also be followed here. Once again, your admin will usually have done this for your organization. Select a category by finding it from the list and clicking on the associated radial button (circle) next to it. (Flex Retainers)
- Client Company: Once again, this will have you selecting from a list of existing entries. *IF the company is a new company and has not yet been added to your organization’s ActiveCollab platform, no problem! Simply type the name of the company the way you would like it to appear and then click “+ New Company” which will appear once the system identifies that the company doesn’t exist in the database.
- Budget and Time Tracking: There are two checkboxes here (Enable budget, time and expense tracking | Allow clients to see time and expenses). Place a check mark in which ever box you determine needs to be used. We ALWAYS check “Enable budget, time and expense tracking” because it is necessary for keep the project in scope and assists with capacity planning as well as various other operational endeavors.
- Budgeting type: We use “Time and Expenses”. It is pre-selected, so there is no need to adjust for new DesignStudio projects. There is a field in that section where you can (and SHOULD) enter the total project value. This is imperative for budget tracking. (Using the billing rate ($70) and retainer size (500 hrs) from above, the value of this project is $35,000). *If more invoices are sent to account for additional time/expenses on the project, this field NEEDS to be updated so that the budget tracking is accurate.
- Time and Expense Records: This is preset to “Billable” as the default.
- Change Billable Status: “All Users” is the default here for all DesignStudio projects. “Owners and Project Leaders” can be selected by clicking on it if needed.
- Job Types and Rate on this project: Job Types are already set up by the system admin. Your responsibility as a DesignStudio Project Manager is to go field by field and update the billing rate. Click on the field, and then type the number that represents the correct rate. For this example, the number is 70).
- Once everything has been entered, click the “Update Project” button in the bottom left-hand corner.
- This will bring you to the “Invite People” screen

- Here you will add the relevant people to your project. In most cases we will add the entire DesignStudio team to a project. You can add people by typing their name (or team name) in the search field. Once you have the correct person/team in the search field, click the “Invite” button to add them.
- Repeat this process as needed. Once done click “Take me to the Project”. IF you need to add clients to the project, this can be done in the same manner. The client section is below the “Members” section. One additional thing you can do from this screen is choose/change a leader by clicking the crown icon next to the name of the person you want to lead the project. If you are the PM setting up the project, the system will default to you as the leader.
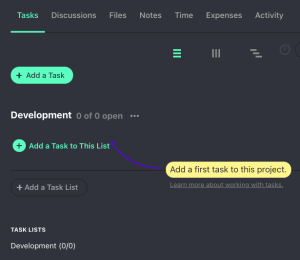
- Once you are on the project screen, you will be able to add task lists and individual tasks to each task list.
 From that screen you will click the “Start a New Project” button on the upper left-hand side of the screen. This opens a new window where you will start adding information about the project.
For additional help with ActiveCollab or Project Management, visit our Knowledge Base.